We often get questions on how to get Linux to work with Mimo and other DisplayLink based monitors. Linux is continually evolving and each new build adds better support for USB touch monitors.
If you are just getting started with Linux, we highly suggest you use the latest Ubuntu version (14.04.1 LTS as of this writing - http://www.ubuntu.com/download/desktop/). The reason we suggest this is that 14.04 is the first Ubuntu to "just work" with USB Monitors. There are no drivers to install or configuration files to edit. It works like Windows does now. It is recognized automatically by the OS, and can be managed via the display settings under the desktop GUI. All Mimo touch controllers are also part of the OS, and therefore also do not require any driver installation. Ubuntu 14.04 is the easiest Linux version at this time.
However, sometimes it is necessary to work with different versions / builds of Linux, and with different types of hardware. While Linux is a very good operating system, it can be tricky to get working. Here below are step-by-step directions to install a USB Mimo Monitor under Ubuntu 12.04-LTS on a VIA Artigo 1150. This directions, slightly modified, should work for most installations of 12.04 and Mimo.
A few thoughts before we begin. This guide is intended for users that may or may not be familiar with Linux. For experts, or even mildly proficient users, this guide may seem overly detailed. For those users, please take what you want from this guide. For the rest, we hope this is the proper level of detail. Mimo are not experts on Linux, so we wrote this guide for users like us that are very familiar with computing, but not with Linux.
Another thought from the author: I prefer to take a step-by-step approach to getting to the end goal. There may be other, faster ways to get there, but this methodical approach means that if something goes wrong, the step is small and debugging is easier. It is certainly possible to leave out a number of these steps when it comes to bringing up the video, however debugging with Linux always seems inevitable. Related to the thought above, I will leave this up to your individual level of comfort.
We welcome comments, questions, and enhancements to this guide. Just email us at info@mimomonitors.com
- Download Ubuntu: Using a separate machine (or a separate OS on the Artigo) download 12.04-LTS 32-bit from Ubuntu from here (http://www.ubuntu.com/download/desktop) . We have been told by Via that there are multiple incompatibilities with the 64 bit version, so stick with 32 bit. This will download a .ISO file.
- Create Bootable USB: We used windows, so we downloaded the Universal USB Installer from here (http://www.pendrivelinux.com/universal-usb-installer-easy-as-1-2-3/). We used UUI to install the .ISO downloaded above onto a USB stick of at least 1 GB. It need not be empty. More detail here (http://www.ubuntu.com/download/desktop/create-a-usb-stick-on-windows)
- Plug the USB Stick into the Artigo. Plug in a mouse, keyboard and either VGA or HDMI video. Do not plug in the Mimo at this time. It is possible to run ONLY the Mimo when setup is complete if you wish, but you will need VGA or HDMI during initial setup.
- Turn the Artigo on or reboot. When the VIA splash screen appears, press <Delete> to enter the BIOS.
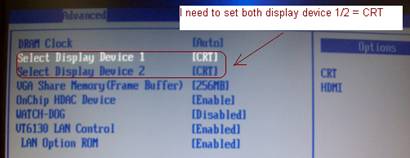
- Go to Advanced->CRB Configuration and change both display devices to CRT (VGA) or both to HDMI depending on which video port you are utilizing. This corrects an error where the Artigo would get blank screen during the Ubuntu 12.04 installation process.
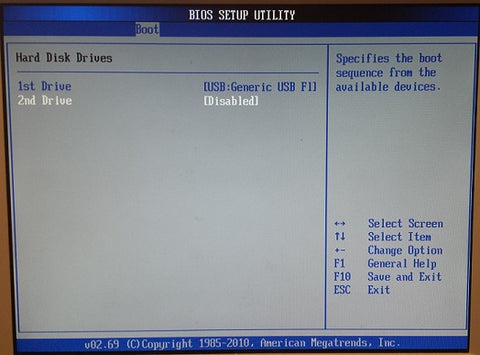
- Go to Boot->Hard Disk Drives to enable the external USB flash drive and disable the on-board SATA HDD
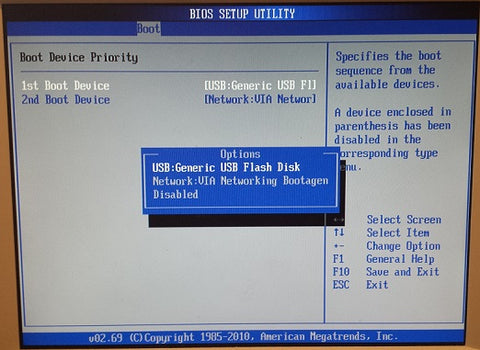
- Go to Boot -> Boot Device Priority to setup for 1st Boot Device for Ubuntu 12.04 installation
- Hit F10 to commit and reboot. This should boot the USB drive
- Install Ubuntu: Once the USB boots, hit the keyboard when the symbol appears on the screen and install Ubuntu. We chose English install and then to ‘Install Ubuntu’. We will not cover all the installation steps. There is an excellent guide here (http://www.ubuntu.com/download/desktop/install-desktop-long-term-support)
- Be sure that the Artigo is on the network. Once Ubuntu is installed completely, REMOVE THE USB DRIVE (important). Reboot.
- It boots into Low graphics mode in our setup. This may not happen under all conditions (we are not sure). Drop into TTY by hitting CTRL-ALT-F1 and login.
- Type: ‘cd /etc/X11’, then ‘sudo cp xorg.conf.failsafe xorg.conf’ it will ask for the password.
- Optional: The author prefers to be able to ssh into the Artigo. To do this type ‘sudo apt-get install openssh-server’
- Plug in the Mimo Monitor
- Type ‘sudo reboot now’.
After booting, you should have an Ubuntu session on the VGA/HDMI display and an Ubuntu splash screen on the Mimo. You can test the touch interface if you wish. If you touch the Mimo, you should see the cursor move on the VGA monitor. This is just a test to make sure it loaded. The touch interface will move to the Mimo before we are done.
- Open a terminal: ‘CTRL-ALT-t’ is the easiest, but there are multiple ways.
- Type ‘sudo apt-get install xserver-xorg-video-displaylink’
- Type ‘dmesg | grep DisplayLink’ and take note of the line: ‘udlfb: DisplayLink USB device /dev/fb0 1024x600 resolution. Using 2400K framebuffer memory’. In this case, the display attached as /dev/fb0.
- Type ‘cd /etc/X11’ and then using your favorite editor edit xorg.conf so that it uses the code below, making care to change the line in red to whatever /dev/fb was attached. The author used vi by typing ‘sudo vi xorg.conf’ (then hit ‘i’ for insert, copied in the file below, then ‘esc’ and ‘:wq’.
Section "Device"
Identifier "Configured Video Device"
Driver "via"
EndSection
Section "Monitor"
Identifier "Configured Monitor"
EndSection
Section "Screen"
Identifier "Default Screen"
Monitor "Configured Monitor"
Device "Configured Video Device"
DefaultDepth 16
EndSection
Section "Device"
Identifier "Mimo"
Driver "displaylink"
Option "fbdev" "/dev/fb0"
EndSection
Section "Monitor"
Identifier "MimoMonitor"
EndSection
Section "Screen"
Identifier "MimoScreen"
Device "Mimo"
Monitor "MimoMonitor"
DefaultDepth 16
EndSection
Section "ServerLayout"
Identifier "Main"
Screen 0 "MimoScreen"
Screen 1 "Default Screen" LeftOf "MimoScreen"
Option "Xinerama" "on"
EndSection
- Reboot or restart the x session (sudo service lightdm restart) and you should have both screens running
